
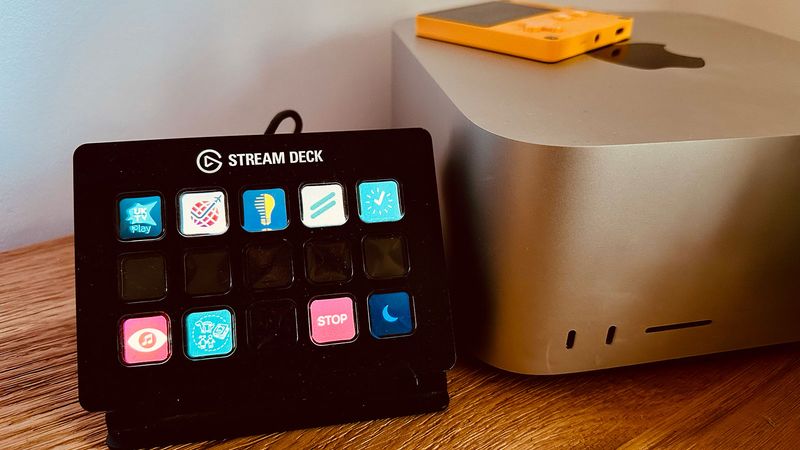
The Elgato Stream Deck is a fun device with 15 LED buttons that can be programmed to do whatever you want through an app that runs on PC and Mac. It was designed for streamers to be able to quickly switch scenes or present overlays but it has quickly become popular in other areas thanks to its flexible design. I picked one up in 2018 when I was dabbling with streaming but then mostly used it as control box for my Cessna 152 in Flight Simulator 2020 thanks to FlightDeck. I eventually replaced this with a bigger flight sim setup1 so the Stream Deck was sitting idle until I had the idea to integrate it into my app development workflow.
I typically work on multiple projects per day as I have a number of active client projects at any one time along with my own independent apps. This means I often waste time getting set up for each project so my initial idea was to have a single button press to get my workspace configured.
For example, I may want to start a specific Toggl timer, open a Jira board, and open the Xcode project. To do this, I created a single AppleScript file that is opened by the Stream Deck that will look something like this:
tell application "Timery"
	activate
	tell application "System Events" to keystroke "1" using command down
end tell

do shell script "open https://example.com/jira-board/"

tell application "System Events" to tell process "Safari"
	set frontmost to true
	if menu item "Move to DELL P2415Q" of menu 1 of menu bar item "Window" of menu bar 1 exists then
		click menu item "Move to DELL P2415Q" of menu 1 of menu bar item "Window" of menu bar 1
	end if
	set value of attribute "AXFullScreen" of window 1 to true
end tell

do shell script "open ~/Files/Clients/UKTV/iOS/App\\ Files/UKTV.xcodeproj"
In the first block I activate the Timery app and tell it to perform the keyboard shortcut ⌘+n where n is the project as it appears in Timery’s list. This will start a timer going for the project so I can track my time. I typically only use this for clients that I’m working with on a large project or have a regular maintenance contract with; for smaller ad hoc work I’ll instead throw an alert to remind me to start a timer manually.
The second block will open a URL in Safari to any website I might find relevant. This is typically a Jira or Trello board but can sometimes be to some API documentation, a GitHub issue pages, or even a local URL to open up a list in Things.
The third block is very specific to my hardware setup. I have an ultrawide monitor that I use as my primary display and then a 4K Dell monitor in portrait orientation to the side that I typically use for browsing and iOS simulators. This code tells Safari to move to that portrait monitor and then switch to full screen mode.
The final line opens up the Xcode project. I usually work in fullscreen mode on my primary monitor so it’ll typically move to a new space automatically without me needing to program that in.
With this simple script, I can press a single button to get everything configured. It’s probably only saving me 20 seconds of time but psychologically it lets me jump immediately into a project.
Another minor hassle I encounter on a daily basis is opening up the directory where all of a project’s files are stored. I’ll typically do this if I need to look at some artwork I’ve saved or some documentation so I have a very simple script to open up the current project directory:
do shell script "open ~/Files/Clients/UKTV/"This is again a psychological improvement as I hate wasting time digging down through Finder to get to the location I need.
So far I’ve only made minor improvements to my productivity but this last button saves me a huge amount of time; automated building. Whilst many developers will handle this task with some form of Continuous Integration or using the new Xcode Cloud feature, this typically doesn’t work well for me due to the number of projects I’m involved with at any one time. Instead, I use Fastlane to perform a wide array of tasks at once such as increasing build numbers, pushing to GitHub, building, and uploading to TestFlight.
Here is a typical Fastfile2 for one of my client projects:
# Config
xcode_version = "14.1.0"
targets = ["UKTV", "NotificationServiceExtension"]
git_remote = "origin/main"

# Import shared Fastfile
import "~/Files/Scripts/SharedFastfile.rb"

lane :distribute do

  ensure_git_status_clean()

  xcode_select("/Applications/Xcode-" + xcode_version + ".app")

  shared_increase_version(
    targets: targets.join(","),
    push_to: git_remote
  )

  version = File.read("shared-tmp.txt")
  UI.important(version)

  build_app(
    output_directory: "builds",
    output_name: version
  )

  upload_to_testflight(
    ipa: "builds/" + version + ".ipa",
    skip_submission: true,
    skip_waiting_for_build_processing: true,
  )

  upload_symbols_to_crashlytics(dsym_path: "builds/" + version + ".app.dSYM.zip", binary_path: 'scripts/upload-symbols')

end
To start with I specify the Xcode version I want to use, the targets of the project, and the name of the remote git repository. I then import a Ruby file which I’ll come to shortly.
The only lane is distribute and the first check is to ensure the Git repository is clean. If there are any uncommitted changes, the script will exit out and present an error. I then select the correct version of Xcode3.
The next section includes a shared_increase_version() function which comes from the imported Ruby file:
##
# INCREASE_VERSION
#
# Prompts the user for a version number. If new provided, update all targets and reset
# builder number to 1. Otherwise, just bump the build number.

private_lane :shared_increase_version do |options|

  # Fetch all targets as comma-separated string and convert to array
  if !options[:targets]
    UI.user_error!("You must provide at least one target in 'targets'")
  end
  targets = options[:targets].split(",")

  # Fetch current version using default Fastlane action with the first target
  version = get_version_number(target: targets.at(0))

  # Prompt for new marketing version
  new_version = UI.input("New marketing version? <press enter to keep it at v#{version}>")

  if new_version.strip == ""
    # No change to version so just increase build number
    increment_build_number()
  else
    # Loop through each target and increment version number with "versioning" plugin
    # The native 'increment_version_number' action does not work with recent versions of Xcode
    targets.each do |target|
      increment_version_number_in_plist(version_number: new_version, target: target)
    end
    version = new_version

    # Set build number to 1 using default Fastlane action (shows a warning about ${SRCROOT} but it does work)
    if options[:alwaysIncrementBuildNumber]
      increment_build_number()
    else
      increment_build_number(build_number: 1)
    end

  end

  # Fetch build number
  build_number = get_build_number()

  # Write the new version number to the shared-tmp.txt file so calling lane can pick it up
  # This is a limitation of Fastlane not being able to return values in a shared lane
  version_string = "v" + version + "-b" + build_number
  File.write("shared-tmp.txt", version_string)

  # Message to the user to show the new version and build number
  UI.success("App Version Updated: v" + version + " (build " + build_number + ")")

  # If there is no git remote to push to, then exit the lane
  if !options[:push_to] || options[:push_to].strip == ""
    UI.success("Skipping git")
    next
  end

  # Commit the version change
  commit_version_bump(message: "v" + version + " (build " + build_number + ")", force: true)

  # Add a git tag in the format "builds/v1.1-b3"
  add_git_tag(includes_lane: false, prefix: "v" + version + "-b", build_number: build_number)

  # Push to specified remote
  git_remote = options[:push_to].split("/", 2)
  remote = git_remote[0]
  branch = git_remote[1]
  push_to_git_remote(remote: remote, remote_branch: branch)
end
I won’t go through this line by line but the basic idea is that it will prompt me to ask whether this is a new version of the app or a new build; if the former, the version is updated to the one specified and the build number set to 1 across all targets; if the latter, then I just bump the build number. Once that is done, a version string is created that looks something like v1.2.3-b2 which I will use later in the workflow; this string is saved to a temporary file so the original Fastfile can reference it.
With the version and build number updated, the script then commits the changes to Git, tags them, and pushes them to the remote branch if one was specified.
The code resumes in the Fastfile with an Xcode build command (which stores the build and it’s dSYMs in a local directory), an upload to TestFlight, and the uploading of the dSYMs to the Crashlytics service.
With this system in place, I can press one button to have the entire build process execute in the background. This is hugely important to me as I can start work on another project whilst this process plays out; on the Mac Studio I don’t even notice anything is happening as the build process doesn’t come close to maxing out the CPU.
The nice thing about this Fastlane system is that I can make it bespoke for projects that need something a little different. Here, for example, is the file for a Catalyst project I work on:
# Config
xcode_version = "14.1.0"
targets = ["ATPDigital7"]
git_remote = "origin/master"

# Import shared Fastfile
import "~/Files/Scripts/SharedFastfile.rb"

##
# LANES
##

lane :distribute do

  xcode_select("/Applications/Xcode-" + xcode_version + ".app")

  ensure_git_status_clean()

  shared_increase_version(
    targets: targets.join(","),
    push_to: git_remote,
    alwaysIncrementBuildNumber: true
  )

  system("git push helastel HEAD:develop")

  version = File.read("shared-tmp.txt")
  UI.important(version)

  ios_export = "ios-" + version
  mac_export = "mac-" + version

  # Build the macOS app
  build_app(
    catalyst_platform: "macos",
    output_directory: "builds",
    output_name: mac_export
  )

  # Rename the macOS app export to mac-v1.0-b1.app
  FileUtils.mv("../builds/ATPdigital 8.app", "../builds/" + mac_export + ".app")

  # Zip the macOS app and then upload it to S3
  zip(
    path: "builds/" + mac_export + ".app",
    output_path: "builds/" + mac_export + ".zip"
  )
  s3_upload(
    access_key_id: "IMNOTTHATSILLY",
    secret_access_key: "Uhuhuhyoudidntsaythemagicword",
    bucket: "bucketname",
    content_path: "builds/" + mac_export + ".zip",
    name: "clients/bgs/builds/" + mac_export + ".zip"
  )

  # Build the iOS app
  build_app(
    catalyst_platform: "ios",
    output_directory: "builds",
    output_name: ios_export
  )

  upload_symbols_to_crashlytics(dsym_path: "builds/" + mac_export + ".app.dSYM.zip", binary_path: 'scripts/upload-symbols')
  upload_symbols_to_crashlytics(dsym_path: "builds/" + ios_export + ".app.dSYM.zip", binary_path: 'scripts/upload-symbols')

  # Upload macOS app to TestFlight
  upload_to_testflight(
    pkg: "builds/" + mac_export + ".pkg",
    skip_submission: true,
    skip_waiting_for_build_processing: true,
    app_platform: "osx"
  )

  # Upload iOS app to TestFlight
  upload_to_testflight(
    ipa: "builds/" + ios_export + ".ipa",
    skip_submission: true,
    skip_waiting_for_build_processing: true,
  )

end
This one is a lot more involved but the basic steps are very similar:
- Set up the configuration that is needed
- Select Xcode, check the repo is clean, and bump the version number
- Do another Git push to a different repo
- Build the macOS version of the app, zip it, and upload it to an Amazon S3 instance
- Build the iOS version of the app
- Upload the dSYMs to Crashlytics for both versions
- Upload each version to TestFlight
The process typically takes about 20 minutes to run but would take longer if I were doing it manually as there are multiple points that would require user interaction. That I can press one button and have this run seamlessly in the background is of huge benefit to me, especially if I’m doing multiple builds in a single day.
I also have a client that has 6 apps that all come from the same codebase. Again, I can press one button and have all 6 of those apps compiled and uploaded; it also automatically submits each app to the App Store once the builds have finished processing!
I’m planning on extending this further in the future as I create a HTML page for some clients which gives a changelog for each build based on the commit messages. At the moment I do this manually but I could easily automate that with AppleScript and hook it into this process.

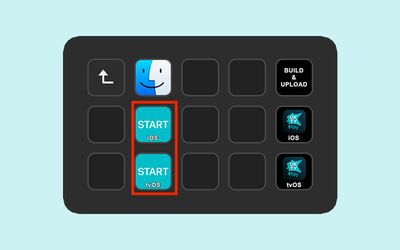
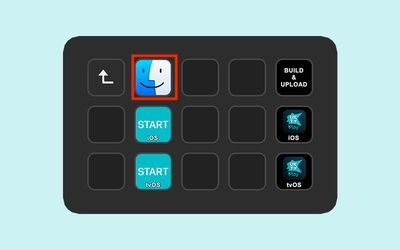
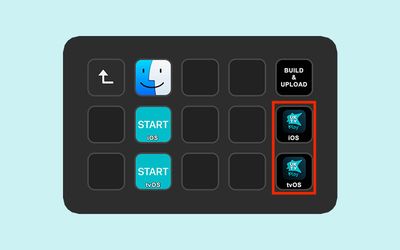
The final thing to mention is the Stream Deck homescreen itself. I have a folder for each project denoted by their app icon which then goes into the start / build commands detailed above. There is also a STOP button will stop any Toggl timer that is currently running and a sleep button that will turn off the Stream Deck display.
I have been incredibly impressed with the Stream Deck as an input device and think it can be an incredibly valuable tool for any app developer that works on multiple projects. All of the above can be achieved by just running an AppleScript file (as that is what the Stream Deck is doing) but I find the tactile nature of the device to be incredibly rewarding and I know there is a ton more I’m going to do with it over time.
-
The Bravo Throttle Quadrant has physical buttons on it for dealing with auto pilot settings and flaps which were my main use cases with FlightDeck. ↩︎
-
All of the magic works in the Fastfile but the Stream Deck still needs to be able to start the command so I use an AppleScript to open Terminal and kick off
fastlane distributein the correct directory. ↩︎ -
I have 3-4 versions of Xcode installed at any one time as different clients will be on different release schedules so I may still need to build something with an older version. I’ll likely change this portion of the script to always use the latest version unless I manually specify one as it’s a pain to edit my script files whenever a new Xcode update comes out. ↩︎