
At WWDC 2017, Apple introduced the Vision framework alongside iOS 11. Vision was designed to help developers classify and identify things such as objects, horizontal planes, barcodes, facial expressions, and text. However, the text detection only recognized where text was displayed, not the actual content of the text1. With the introduction of iOS 13 at WWDC last week, this has thankfully been solved with some updates to the Vision framework adding genuine text recognition.
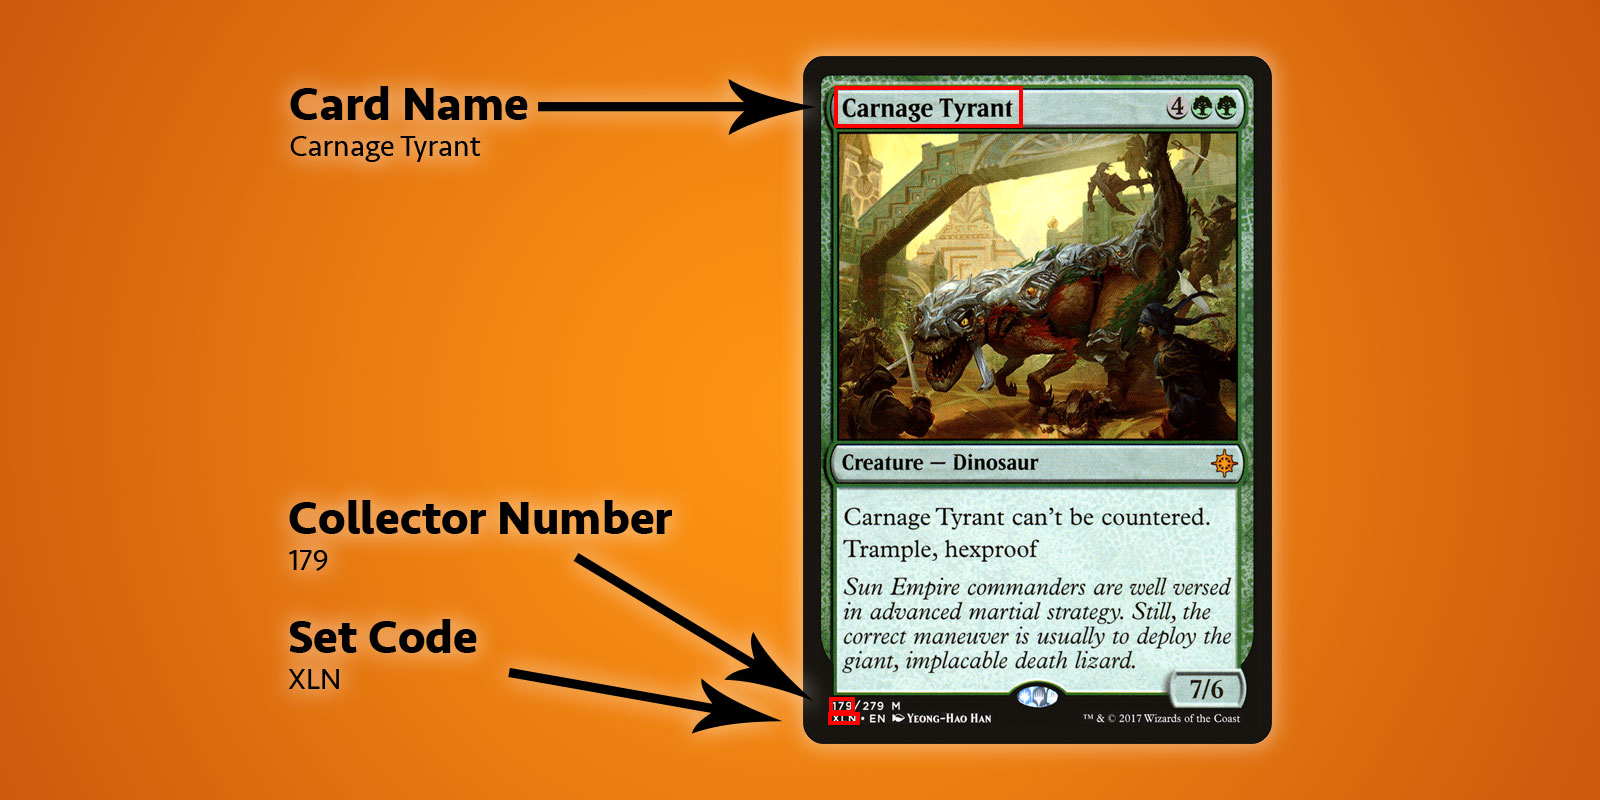
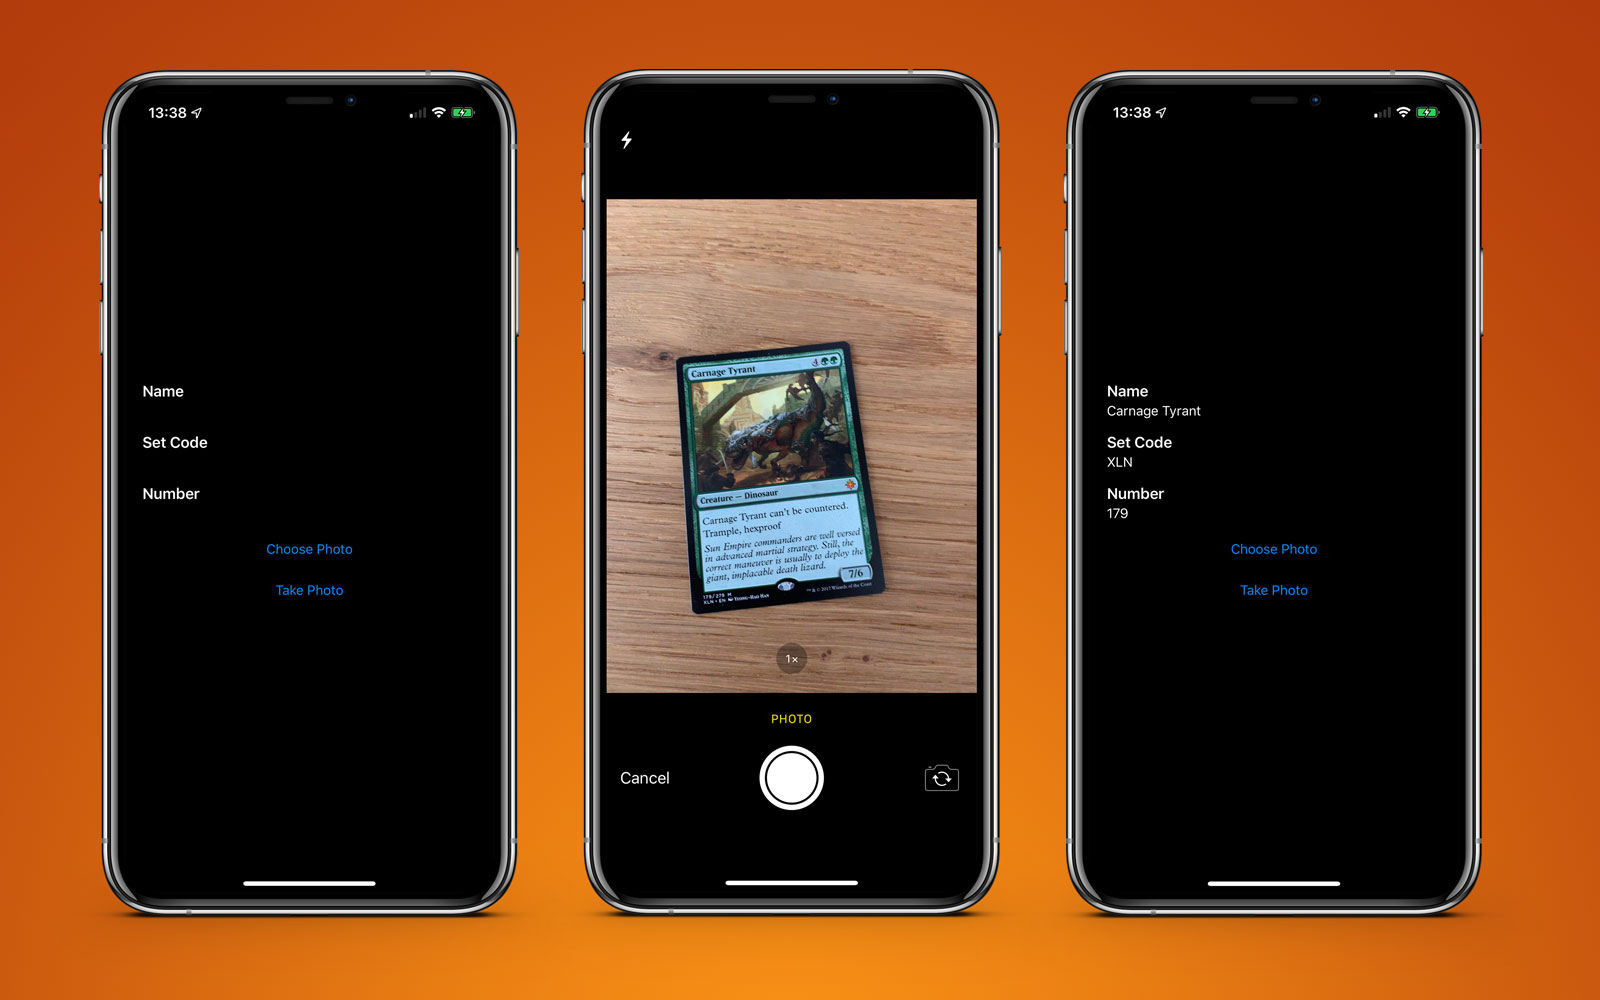
To test this out, I’ve built a very basic app that can recognise a Magic The Gathering card and retrieve some pertinent information from it, namely the title, set code, and collector number. Here’s an example card and the highlighted text I would like to retrieve.
You may be looking at this and thinking “that text is pretty small” or that there is a lot of other text around that could get in the way. This is not a problem for Vision.
To get started, we need to create a VNRecognizeTextRequest. This is essentially a declaration of what we are hoping to find along with the set up for what language and accuracy we are looking for:
let request = VNRecognizeTextRequest(completionHandler: self.handleDetectedText)
request.recognitionLevel = .accurate
request.recognitionLanguages = ["en_GB"]
We give our request a completion handler (in this case a function that looks like handleDetectedText(request: VNRequest?, error: Error?)) and then set some properties. You can choose between a .fast or .accurate recognition level which should be fairly self-explanatory; as I’m looking at quite small text along the bottom of the card, I’ve opted for higher accuracy although the faster option does seem to be good enough for larger pieces of text. I’ve also locked the request to British English as I know all of my cards match that locale; you can specify multiple languages but be aware that scanning may take slightly longer for each additional language.
There are two other properties which bear mentioning:
customWords: you can provide an array of strings that will be used over the built-in lexicon. This is useful if you know you have some unusual words or if you are seeing misreadings. I’m not using it for this project but if I were to build a commercial scanner I would likely include some of the more difficult cards such as Fblthp, the Lost to avoid issues.minimumTextHeight: this is a float that denotes a size, relative to the image height, at which text should no longer be recognized. If I was building this scanner to just get the card name then this would be useful for removing all of the other text that isn’t necessary but I need the smallest pieces so for now I’ve ignored this property. Obviously the speed would increase if you are ignoring smaller text.
Now that we have our request, we need to use it with an image and a request handler like so:
let requests = [textDetectionRequest]
let imageRequestHandler = VNImageRequestHandler(cgImage: cgImage, orientation: .right, options: [:])
DispatchQueue.global(qos: .userInitiated).async {
    do {
        try imageRequestHandler.perform(requests)
    } catch let error {
        print("Error: \(error)")
    }
}
I’m using an image direct from the camera or camera roll which I’ve converted from a UIImage to a CGImage. This is used in the VNImageRequestHandler along with an orientation flag to help the request handler understand what text it should be recognizing. For the purposes of this demo, I’m always using my phone in portrait with cards that are in portrait so naturally I’ve chosen the orientation of .right. Wait, what? It turns out camera orientation on your device is completely separate to the device rotation and is always deemed to be on the left (as it was determined the default for taking photos back in 2009 was to hold your phone in landscape). Of course, times have changed and we mostly shoot photos and video in portrait but the camera is still aligned to the left so we have to counteract this. I could write an entire article about this subject but for now just go with the fact that we are orienting to the right in this scenario!
Once our handler is set up, we open up a user initiated thread and try to perform our requests. You may notice that this is an array of requests and that is because you could try to pull out multiple pieces of data in the same pass (i.e. identifying faces and text from the same image). As long as there aren’t any errors, the callback we created with our request will be called once text is detected:
func handleDetectedText(request: VNRequest?, error: Error?) {
    if let error = error {
        print("ERROR: \(error)")
        return
    }
    guard let results = request?.results, results.count > 0 else {
        print("No text found")
        return
    }

    for result in results {
        if let observation = result as? VNRecognizedTextObservation {
            for text in observation.topCandidates(1) {
                print(text.string)
                print(text.confidence)
                print(observation.boundingBox)
                print("\n")
            }
        }
    }
}
Our handler is given back our request which now has a results property. Each result is a VNRecognizedTextObservation which itself has a number of candidates for us to investigate. You can choose to receive up to 10 candidates for each piece of recognized text and they are sorted in decreasing confidence order. This can be useful if you have some specific terminology that maybe the parser is getting incorrect on the first try but determines correctly later even if it is less confident. For this example, we only want the first result so we loop through observation.topCandidates(1) and extract both the text and a confidence value. Whilst the candidate itself has different text and confidence, the bounding box is the same regardless and is provided by the observation. The bounding box uses a normalized coordinate system with the origin in the bottom-left so you’ll need to convert it if you want it to play nicely with UIKit.
That’s pretty much all there is to it. If I run a photo of a card through this, I’ll get the following result in just under 0.5s on an iPhone XS Max:
Carnage Tyrant
1.0
(0.2654155572255453, 0.6955686092376709, 0.18710780143737793, 0.019915008544921786)


Creature
1.0
(0.26317582130432127, 0.423814058303833, 0.09479101498921716, 0.013565015792846635)


Dinosaur
1.0
(0.3883238156636556, 0.42648010253906254, 0.10021591186523438, 0.014479541778564364)


Carnage Tyrant can't be countered.
1.0
(0.26538230578104655, 0.3742666244506836, 0.4300231456756592, 0.024643898010253906)


Trample, hexproof
0.5
(0.2610074838002523, 0.34864263534545903, 0.23053167661031088, 0.022259855270385653)


Sun Empire commanders are well versed
1.0
(0.2619712670644124, 0.31746063232421873, 0.45549616813659666, 0.022649812698364302)


in advanced martial strategy. Still, the
1.0
(0.2623249689737956, 0.29798884391784664, 0.4314465204874674, 0.021180248260498136)


correct maneuver is usually to deploy the
1.0
(0.2620727062225342, 0.2772137641906738, 0.4592740217844645, 0.02083740234375009)


giant, implacable death lizard.
1.0
(0.2610833962758382, 0.252408218383789, 0.3502468903859457, 0.023736238479614258)


7/6
0.5
(0.6693102518717448, 0.23347826004028316, 0.04697717030843107, 0.018937730789184593)


179/279 M
1.0
(0.24829587936401368, 0.21893787384033203, 0.08339192072550453, 0.011646795272827193)


XLN: EN N YEONG-HAO HAN
0.5
(0.246867307027181, 0.20903720855712893, 0.19095951716105145, 0.012227916717529319)


TN & 0 2017 Wizards of the Coast
1.0
(0.5428387324015299, 0.21133480072021482, 0.19361832936604817, 0.011657810211181618)
That is incredibly good! Every piece of text that has been recognized has been separated into it’s own bounding box and returned as a result with most garnering a 1.0 confidence rating. Even the very small copyright text is mostly correct2. This was all done on a 3024x4032 image weighing in at 3.1MB and it would be even faster if I resized the image first. It is also worth noting that this process is far quicker on the new A12 Bionic chips that have a dedicated Neural Engine; it runs just fine on older hardware but will take seconds rather than milliseconds.
With the text recognized, the last thing to do is to pull out the pieces of information I want. I won’t put all the code here but the key logic is to iterate through each bounding box and determine the location so I can pick out the text in the lower left hand corner and that in the top left hand corner whilst ignoring anything further along to the right. The end result is a scanning app that can pull out exactly the information I need in under a second3.
This example app is available on GitHub.
-
This seemed odd to be me at the time and still does now. Sure it was nice to be able to see a bounding box around individual bits of text but then having to pull them out and OCR them yourself was a pain. ↩︎
-
Although, ironically, the confidence is 1.0 but it put TN instead of ™ and 0 instead of ©. A high confidence does not mean the parser is correct! ↩︎
-
In reality I only need the set number and set code; these can then be used with an API call to Scryfall to fetch all of the other possible information about this card including game rulings and monetary value. ↩︎